May 31, 2010

Episode 22 - Hacking Wireless Using Grim Wepa

Happy Memorial Day everyone! I hope you are all enjoying the long weekend. I also hope that you all have taken a moment to think about those who have fallen in the defense of this great country of ours! As a Navy veteran I can tell you first hand that it is not easy being in the military and being far away from home while defending the freedoms of the people you left behind. I couldn't imagine what it is like for those left behind who have had their loved one die in combat. Today is about remembering the ones who have died, and their families left to carry on.

With that said, today is a great memorial Day because Episode 22 released today! In this episode I show you how to hack WEP encrypted wireless access points using a GUI program in Linux called Grim Wepa. For this demo I setup an access point using WEP, and a password that I have actually seen being used in the work place. Now you must be asking why I am showing this? Everyone has seen WEP being cracked. Well, you don't often see it cracked using a GUI in Linux. Not to mention this tool will let you crack WPA as well, although it is a little more difficult. Grim Wepa is pretty easy to install yourself, however it is already included in Bauer-Puntu Linux 10.04! Without further ado, here is Episode 22!


Thanks for watching! I want to apologize about the audio in the beginning. I thought my mic was turned on, but it wasn't so I had to use the camera mic. The last part everything was fine though. I would have gone back and re-filmed, but I didn't have the time. Either way, I hope you learned something from it, and if you haven't yet, perhaps you will try out Bauer-Puntu!

If you have any questions, comments or suggestions, hit me up in the comments!

May 28, 2010

How To Hack Your MagicJack Part 4 – Using MagicJack as a SIP Trunk

Okay, this is going to be my last post on hacking your Magicjack, as all my messing around is seriously pissing my wife and colleagues at work off. It takes a little finagling to get this working. If you have a heavy duty firewall like a Cisco ASA, then you will have to modify this setup a bit which I will cover later. The reason is that enterprise Firewalls may consider my setup as a possible LAND Attack and will drop packets. However, if you can afford a Cisco ASA, then you probably can afford a real telephone solution anyway. No, this post is more geared for the SOHO network using a simple Linksys or D-Link type router. This is more of an ideal solution, as that is how Magicjack is designed. I will still give you a tip on how to get it working behind a Cisco ASA ;-P

Once again, as previously stated, this violates Magicjack’s TOS. Perform this setup at your own risk. I accept no responsibility!

So here is what you will need for this project:

Now I will not get into the install portion of 3CX, as it is pretty easy, but if you must see how it is done, here is a clip from Hak5 Episode 503 where Matt Lestock shows us how to install 3CX and have it basically up in running in about 10 minutes.


After you have 3CX setup, we need to get our proxy going. In a SOHO environment, we can set it up on the same server as 3CX. To do that download MJMD5, and extract it to C:\MJMD5. Run it once to configure your settings and select the option to save the settings (See part one for more info). MJMD5 will save your settings in an INI file that it will now use as it’s defaults. Once you have that configure a scheduled task to run as SYSTEM to kick off MJMD5.exe at start up. You will now have MJMD5 basically running as a service!

Now that we have that running as a service, you will need to open the following ports on your firewall to point to your 3CX/MJMD5 Proxy server:

  • 5060 UDP
  • 5070 UDP
  • 3478 UDP
  • 9000-9003 UDP (Higher for more phone connections)

With those ports open we need to configure our SIP trunk to point back at our 3CX server using our Public IP address. You should have the following settings under VOIP Providers (Click for larger images):

             VOIP1

Voip2


Voip3

Note that the IP address in the first picture needs to be your public IP address. Your Authentication ID and Password will be your Magicjack username and password.

Once that is working correctly, you should see that your SIP trunk is now active:

Voip4

before you can make outbound calls, you will need to create an Outbound dialing rule. The simplest method is shown below which makes it so people need to dial a 9 before dialing an outside line.

Voip5You probably want people to call you too right? For that we need an inbound rule. For that, all you need is to set it up similar to mine with your Magicjack number minus area code and an asterisk next to it. For example 1234567*. After that you have to specify a destination extension. I created a ring group so both my wife’s phone and my phone ring at the same time. You can set yours up however you want.

Voip6

That is about it. Now you have a working PBX at your home office or small office using a $20 per year SIP trunk as the connection!

I mentioned setting this up using a higher grade Firewall like a Cisco ASA. For that to work you will have to have a second server on the same subnet to act as the proxy server. The reason being is that really good firewalls will drop packets if the source packet comes from an IP address on the internal network. They think it is what is known as a LAND attack.

When I did my testing I first used my D-Link wireless N router at home, so the SOHO scenerio worked fine. For my lab at work I setup mjproxy on a Linux server. I mentioned how to do that in Part 3. The only difference was I created a shell script and added it to rc.d to run as a daemon at startup. If you aren’t Linux savvy, you can do the Scheduled task trick on another Windows server on the same subnet. Either way, 3CX needs to point to the proxy server’s internal IP address for SIP authentication. In both cases, ports 5070 need to point to the proxy server no matter if it is hosted on the same server as in the SOHO example, or on a different server in the Cisco ASA example.

Now that our server is setup, we are ready to attach a phone. I used the 3CX softphone for my testing. I like how it looks like an iPhone! Also, it is designed to work natively with 3CX. Here is a screen shot of my config Make sure you point your phone to your 3CX server, not Magicjack!:

phone1

Here is a look at the softphone itself:

 3cx phone

I am still playing with my setup at home. If you try this out, and something isn’t working, hit me up in the comments!


May 27, 2010

How To Hack Your MagicJack To Make Calls From Any SIP Enabled Softphone in Windows and Linux Part 3 – Using Your MagicJack info in Linux

Okay, if you have been following along all week I have showed you how to obtain your Magicjack username and password by doing a memory dump, and I showed you how to use that information to connect a softphone in Windows. What about you Linux users? Well, I am a Linux user myself, so I will show you guys how to do it too.
Like I said before, using other methods to connect to you Magicjack service other than the way magicjack wants you to (USB dongle in Windows) violates their TOS. I accept no responsibility if you lose your account because you want to hack your Magicjack. The following is for educational purposes only, and if you do this, you do so at your own risk.
Ok, lets get what we need:
As I mentioned in yesterday’s post, the way I believe Magicjack authenticates with their proxies is they combine your password with their proxy info to create an MD5 hash. With that hash your can authenticate with their proxies to make and receive calls. Without it, you will not be able to connect. In Windows I mentioned a tool called MJMD5 that creates this hash authentication for you. In Linux, it is a little bit different. In Linux, you have to compile the tool yourself. I am using Ubuntu 10.04 for this.
  1. magicjack Install gcc so you can compile the source code

    >sudo apt-get install gcc
  2. Create a directory called mjproxy

    >mkdir mjproxy
  3. Change into the newly extracted directory

    >cd mjproxy/
  4. Download the mjproxy source

    >wget http://ftp.bauer-power.net/misc/magicjack/mjproxy.c.tgz
  5. Extract it

    >tar -xzvf mjproxy.c.tgz
  6. Compile the source code into a program

    >sudo gcc -o mjproxy md5.c mjproxy.c
  7. Give everyone full permissions

    >sudo chmod 777 mjproxy
  8. Make the program file executable

    >sudo chmod +x mjproxy
  9. Run the following to start the proxy authentication process and leave it running

    >./mjproxy 0.0.0.0 5070 proxy01.<yourcity>.talk4free.com 5070 <MagicjackPassword>
mjproxy
Now that we have our MD5 proxy running, we are ready to setup our SIP softphone! For this I used Twinkle which is available in the repositories. To get it working, do the following:
  1. Install Twinkle

    >sudo apt-get install twinkle
  2. After installation open Twinkle from Menu > Internet > Twinkle
  3. Setup your account information with the following:
    • Your name: Whatever you want
    • Username: Your Magicjack Username (E<YourPhoneNumber>01)
    • Domain: 127.0.0.1:5070
    • Realm: Blank
    • Authentication Name: Your Magicjack Username (E<YourPhoneNumber>01)
    • Password: Your Magicjack Password
    • AKA OP: Leave Deafault
    • AKA AMF: Leave Default
  4. Click OK and you are ready to go!
twinkle1
Now you can make Magicjack calls from your Linux machine! Make sure you have a good USB microphone headset though. When I tried it on my laptop with the internal mic there were a lot of echoes.
The cool part of this setup is that you could configure mjproxy to run as a service by adding it to init.d… Hmmmm, with that you could configure say…. Asterisk or 3CX to authenticate with Magicjack, and share out that number with a bunch of users using extensions.

May 26, 2010

How To Hack Your MagicJack To Make Calls From Any SIP Enabled Softphone in Windows and Linux Part 2 – Using Your MagicJack info in Windows

Yesterday I wrote about how to obtain your Magicjack password by doing a memory dump in Windows. Well what good is that information if you don’t know how to use it? I’ll tell you, it isn’t any good at all! So in the post, I will tell you how to setup a softphone in Windows so you can make inbound and outbound calls using your Magicjack number without having to use the USB dongle! Not to mention, you can set this up on multiple computers!
Once again I want to re-iterate that this violates Magicjack’s TOS. This article is purely for informational purposes, and I accept no liability if you get your Magicjack account pulled because you want to screw the man!
With that little bit of legal mumbo jumbo out of the way, lets get together the stuff you will need:
No, I didn’t mention this in the last post, but you can’t simply use your Magicjack username and password by itself to make inbound and outbound calls. The reason being is the way Magicjack does authentication. Now correct me if I am wrong, but what I gather is Magicjack takes your password and combines it with the proxy for your city and creates an MD5 hash. It then uses that hash to authenticate with the proxy. If you don’t have that hash, you cannot authenticate, and thus cannot make calls. That is where MJMD5 comes in.
  1. Go ahead and download MJMD5 and run it.
  2. Enter 5070 for both the listening and the forwarding port.
  3. Enter your local proxy (proxy01.<yourcity>.talk4free.com)
  4. Enter your Majicjack password
  5. Save your settings
  6. Click Start
MJMD5
With that running, download and install Xlite’s free softphone on the same computer and enter the following:
  1. Display Name: Whatever you want
  2. Username: Magicjack Username (E<yourphonenumber>01)
  3. Password: Your Magicjack password
  4. Authorization user name: Magicjack Username (E<yourphonenumber>01)
  5. Domain: 127.0.0.1:5070
  6. Check Register with domain to receive incoming calls
  7. Select the domain radio button
  8. Click Apply then OK
xlite
That is it! Now you can make inbound and outbound calls without your Magicjack USB dongle in Windows. You can also set this up on as many computers as you want!
Check back tomorrow where I show you how to do the same thing in Linux!

May 25, 2010

How To Hack Your MagicJack To Make Calls From Any SIP Enabled Softphone in Windows and Linux Part 1 – Getting Your Magicjack Password

Over the last few days I decided I was going to figure out how to hack my Magicjack so I could make calls using the SIP information no matter where I was without having to carry around my Magicjack USB dongle. Also, I wanted to be able to make calls in Linux and Windows. Before I could do any of that though I needed the SIP information for my Magicjack!
You see, Magicjack is really a simple device that uses the standard SIP protocol to make inbound and outbound calls. If you are not familiar with SIP, here is an explanation from Wikipedia:
The Session Initiation Protocol (SIP) is an IETF-defined signaling protocol, widely used for controlling multimedia communication sessions such as voice and video calls over Internet Protocol (IP). The protocol can be used for creating, modifying and terminating two-party (unicast) or multiparty (multicast) sessions consisting of one or several media streams. The modification can involve changing addresses or ports, inviting more participants, adding or deleting media streams, etc... Other feasible application examples include video conferencing, streaming multimedia distribution, instant messaging, presence information, file transfer and online games.
Since SIP is the standard, in theory you can take the SIP information from Magicjack and use it on any SIP enabled phone. All you need is the correct Proxy info, username and password! That is where things get tricky. Magicjack doesn’t want you having this information, and using it for any other way other than its intended use is a violation of TOS. I accept no liability if you get your account pulled for violating TOS. This post is purely for informational purposes only.
In theory, one could pay $20 per year for their Magicjack service, then use the SIP information to share out their number using a SIP PBX like Asterisk to say… Oh… 30 users or so. Imagine a small business doing this? The savings could be huge! Once again though, it violates TOS so I wouldn’t recommend it.
In order to get your username and password you will need the following:
You will also have to disable autorun on your Windows workstation. I will let you Google that for yourself. The reason you have to do that is because when you plug in your Magicjack dongle, Windows maps it as a USB drive, launches Magicjack, and then unmounts the USB drive. We don’t want it to do that, as timing is everything. After you have autorun disabled do the following:
  1. Unplug your Magicjack
  2. Kill any Magicjack processes
  3. Unzip MagicJack_Utilitieswsip.zip
  4. Navigate to where you unzipped it, and run SIPDump.exe and enter 4 or 5
    sipdump
  5. Now plugin your Magicjack and manually run MagicJackLoader.exe
  6. When you see the below screen, press OK to start the memory dump process from SIPDump.exe (Note, you have to be fast!)
    sipdumppic3
  7. Let the dump run until you see the following screen:
    sipdumppic4
  8. Go ahead and close out of SIPDump, and you will have several text documents called SIPDump1, SIPDump2 etc. Open Each one that has a file size of 19,000KB or over and do a search for the string SIP.Connection.Refresh with the whole word only option selected.
  9. Hit the search button, and then once more. If there are two selections found, then your password should be within 5-10 lines up or down from the string. The password will be a 20 character password all uppercase usually beginning with the letter B. For example: B6QK1RE4HU7QK8P3ABZB (Made up one)

sipdump7
That is the tricky part. Once you have that, the rest is easy. For example, your username will be the Letter E<YourPhoneNumber>01. The proxy will be proxy01.<yourcity>.talk4free.com. For example:
    • E619123456701
    • proxy01.sandiego.talk4free.com
Tomorrow I will show you how to use this information to use a SIP enabled softphone to make calls in windows without your Magicjack dongle. Then the next day after that, I will show you how to do it in Linux! Stay tuned!
Technorati Tags: ,,,,,

May 24, 2010

Changing The Login For Ubuntu Is Even Easier!

Back in Ubuntu 9.10, the good ol' folks over at Canonical decided to use a different style of login than in previous versions. Before karmic Koala, you could download really cool themes to skin out your GDM login page, and make it look really cool. You could find skins and themes that matched your personality, and make a custom look that was an expression of you! When 9.10 came out, things changed a bit.

I wrote about one way to change the look of your login page back when 9.10 came out. It basically consisted of a command to run as root so you could change your wallpaper, icons, and theme. What was the big change? Well, they did away with the GDM login and went with a faster loading X11 login. Their goal was to decrease boot times at the expense of being pretty.

The way I did it before was okay, but it is sometimes hard to remember funky terminal commands that you don't use very often. I mean, I only used the command I mentioned when I first setup Bauer-Puntu, then after that I just used Bauer-Puntu for new installs. Well, now I don't have to remember that command. I can simply install the new GDM2Setup tool! To install it, run the following commands:


  1. sudo add-apt-repository ppa:gdm2setup/gdm2setup
  2. sudo apt-get update
  3. sudo apt-get install python-gdm2setup

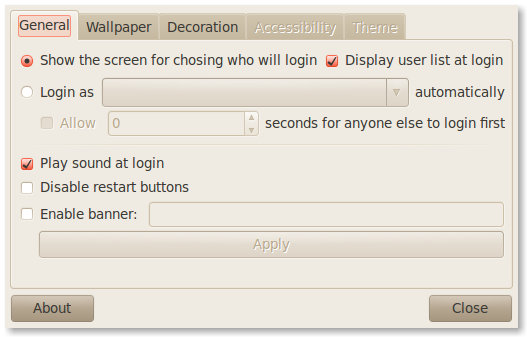
After installing the program, you will find it under the Administration menu. This will give you a GUI program that easily lets you:

  • Set login screen wallpaper, theme & icon set
  • Blur wallpaper
  • Set autologin/delayed login
  • Choose to display userlist
  • Enable/disable login sounds
  • Set login banner message
Here is a screen shot of what the program looks like after it is installed:


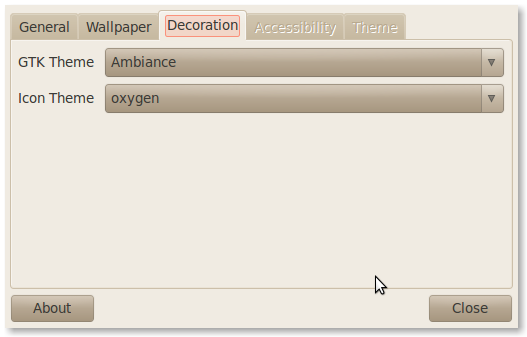
Pretty cool right? The best part about this program for me was it lets me get rid of the Ubuntu logo from the login screen. I suppose I could have done that before using the old terminal command, but I didn't realize it until this program. To do that you just have to change the icon theme from the decoration tab:


I think I will be using this tool when Bauer-Puntu 10.10 comes out! What tools do you use to customize your Ubuntu experience? Let us know in the comments!


May 21, 2010

Goodbye Google Apps Start Page! You Will Be Missed!

I have been an avid Google Apps user for a while now, and have even blogged about it in the past. I use Google Apps for hosting my personal Bauer-Power email even. Though they have made it harder to find on their page, Google is still making a free version of Google Apps called Google Apps Standard Edition so you can take advantage of that too. Overall, I have been very happy with the service… Until now!

You see, on May 13th I received an email stating that they are doing away with the Google Start page service do to requests to make it more like iGoogle. Their response? Do away with it altogether, and replace it with iGoogle. What does that mean for people like me who use it? All my customizations go away! Nice! For you Bauer-Puntu users you will notice that the default home page in Firefox was my Google Apps Start page, not anymore. My custom start page is now history!

Here is the email from the Google Apps team:

evil google logo Dear Google Apps admin,


We’re sharing some news about changes coming in response to many customers who would like the Start Page to work more like the full iGoogle.com experience.


On July 1, 2010, the Start Page will automatically be converted to iGoogle.  The Start Page gadgets your users have configured will be migrated to iGoogle pages, after which users can modify their iGoogle gadgets, tabs and themes.  Your Start Page web address will automatically redirect your users to iGoogle.


No further action is required on your part, but you can convert your Google Apps Start Page to the full iGoogle experience before the automatic migration takes place by opting in from the control panel.  Alternatively, if you would like to retain more control over the user experience, you can consider creating a new User Start Page in Google Sites (http://goo.gl/R4uH), which allows for locked content and control over available gadgets.


We hope this upgrade to iGoogle will give your users a better way to personalize, customize and centralize the information that’s most important to them.  If you think they would benefit from advance notice about this change, please communicate to them as desired.


Thanks,
The Google Apps Team

As the email above states, the change will go into effect on July 1st, however you can make the change right away if you wish. I decided not to prolong the inevitable, so I made the change, then also changed DNS for start.bauer-power.net to point to my FTP server where I configured a new Apache site for it. It is a lot simpler than the old Bauer-Power Start page, but it’s better than a non-custom iGoogle page!

What ticks me off the most is that their reasoning is utter bull crap. Google Apps Start was exactly like iGoogle already, and all the iGoogle widgets worked on it. The only thing was you could customize it. No, this is a marketing/branding move on Google’s part. Plain and simple! Well I say, damn the man!

What is your take on it? Are you happy about the move? Let me know in the comments.

Technorati Tags: ,,


Twitter Delicious Facebook Digg Stumbleupon Favorites More

 
Design by Free WordPress Themes | Bloggerized by Lasantha - Premium Blogger Themes | stopping spam